No Knead Sourdough: Bread in Translation, Part 1
I bake bread. Weekly. I really enjoy baking bread. I find it meditative, and the results are always satisfying, even the failures. I still get results that vary from one bake to the next. Sometimes I just go through the motions, at other times, I pay close attention to my conversation with bread. Yes, bread speaks: it murmurs in sighs and burps while it is still in raw dough form, it snaps and crackles once it is baked up golden and fragrant. Often, when I am uncommitted to the tale being told, the loaf will have a fit and fall flat. It happens. It's what I find so fascinating about baking bread. Twenty years of baking bread, and I'm still figuring things out.
There is so much information available on bread baking nowadays, that I sometimes wonder if I really need to add my two cents. For in depth knowledge and videos on achieving the perfect artisanal loaf at home, I'd advise you to look up Vanessa Kimbell from the Sourdough School, Daniel Larsson of Sourdough Musings, or the Bread Magazine. If, on the other hand, you're willing to bumble along with me, please stick around. I will get a bit technical, and I might get down right nerdy, but I will try to keep it as simple as I can. As always, if you have any questions, please comment below.
At its most basic, bread is composed of flour, yeast, water and salt; you would think that a food made from such simple ingredients would come out the same every single time you follow the same exact recipe. However, as a friend once told me, the simplest ingredients are often the most complex. The kicker: yeast and flour are alive, and just like any other living things, they have their moods. They will react to the weather, the water, the season, to whatever they want to. And there is no way for you to predict which way they will go. There are signs to be read, sighs to be deciphered, and most importantly, textures to be felt for. There are ways to manipulate these ingredients, but you need to understand their language in order to do so. Making bread is an exercise for all the senses.
I started keeping notes on a spreadsheet -because I now apparently like spreadsheets: it is turning out to be more than a progress report, something akin to a personal guide book to bread-speak. Proper sourdough bread take anywhere from 8 to 48 hours from start to end, but only require about an hour and a half of active time, most of it for the actual baking, and its schedule can be adjusted to fit your own, which is quite convenient. The long, slow process of making a sourdough is not only meditative, it improves the digestibility and nutrition of the bread itself. Prolonged contact between flour and water activates enzymes that break down complex starches into simple sugars; these sugars will go on to feed the wild yeasts and lactic bacteria (acid-dwellers); eventually, when the sugars run low, the microcosm will also start munching on gluten itself, rendering it less sticky in our guts. These effects can, to a certain extent, be reproduced with commercial yeast (for anyone who is reluctant to adopt a sourdough), but the benefits of sourdough are incomparable.
To start, you will need a digital weighing scale, preferably a multi-function one, so that you can weigh out the ingredients in grams, I will include imperial weight measurements, but I have to admit that I am rather flummoxed by them. Sourdough baking can be inordinately complex, but is somewhat easier to comprehend when ingredients are weighed instead of measured by volume. Most bakers work with the baker's ratio' instead of precise measurements, where each ingredient is weighed out in proportion to the flour used. Using a scale and knowing the baker's ratio make it much easier to adjust a recipe to suit different flours or even the weather. If you are unsure you want to commit to sourdough baking, you can start with either of my no-knead recipes before investing in a digital scale (no-knead white bread, seeded whole wheat bread), and go from there.
To bake bread, you need a good flour, preferably a strong wheat flour, usually labelled as bread flour. Whether you use a white or whole wheat flour is up to you. Flours that are labelled as being 'strong' or 'for bread' simply indicate that they have a high protein content, and will result in a good gluten structure, which, in turn, will help with the loftiness and texture of your bread. If you are just starting your bread-baking adventure, stick to wheat flour for the time being: specialty flours have varying protein contents, and results can be disappointing if you are unsure of what you are looking for. Unbleached, white bread flour is sometimes difficult to source in Canada, in which case unbleached all-purpose flour might be a viable option. However, since whole wheat bread flour is generally available, even in supermarkets, it might be easier to start by baking whole wheat bread, at least until you become more familiar with bread making. Also, do use unbleached white flour (bleached flour is not available in Europe): the few times I attempted sourdough with bleached flour were complete failures -I suspect that the bleaching agents are lethal to wild yeasts.
Water is possibly the second most important ingredient in bread. Yes, perhaps even more so than the sour starter itself. Water is life: it sustains the wild yeasts and the lactic bacteria in the starter, it activates the enzymes in the flour, and most crucially, it binds the wheat proteins to form gluten, which eventually trap all those gas bubbles to form the open crumb in your loaf. There is, nevertheless, no need to use bottled water: if your tap water is fine to drink, it will be fine for bread. It should, however, be dechlorinated, either by using a filter or simply leaving a bowl or jarful out overnight, uncovered. How much water to add to the dough depends on several factors, namely type of flour, weather and temperature. For beginners, 70% hydration (whereby the final weight of water used equates 70% of the flour's weight) is a good place to start: this amount of water gives a relatively stiff dough that is pliable enough yet not overly fragile to handle. It is also suitable for baking under sweltering hot conditions. Most artisanal sourdoughs use a ratio hovering around 80%, though some bakers like to push the hydration to 100%.
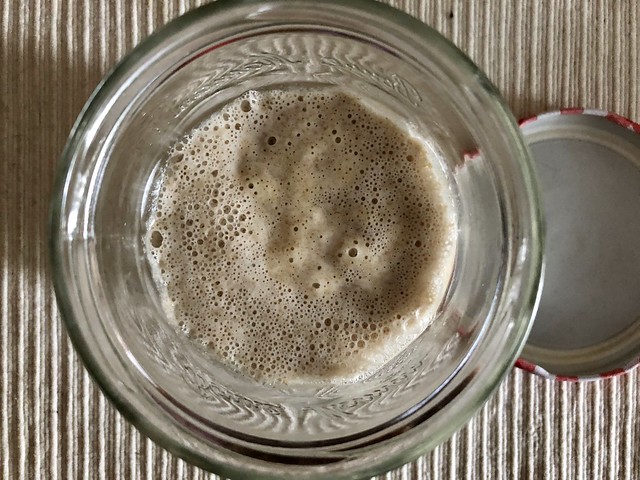
Instruction on how to make your own sourdough starter can be found here. It can be made of any flour, as long as it is unbleached: all purpose (plain), strong, white, brown, wheat, rye. Each flour will impart its own unique flavour compounds to the sour, and subsequently to the bread itself. Nonetheless, it is not necessary to have specific sours for different breads. Of course, should you want to maintain different starters, feel free to do so. As an aside, I have, in a pinch, used gluten-free flours to feed my starter without any adverse effect, so if you find yourself without any wheat or rye flour but happen to have chickpea, rice, tapioca, cornmeal or even potato starch, they can sub in until you find time to buy more wheat flour. By the way, chickpea flour makes a wonderful gluten-free sour starter, if you want to venture into specialty breads. Since the sour leaven is alive, its ratio in bread dough is somewhat flexible, floating around 25%- however, if you are doubling (or more) the dough, it is not necessary to increase the leaven. In fact, too much leaven could adversely speed up the process.
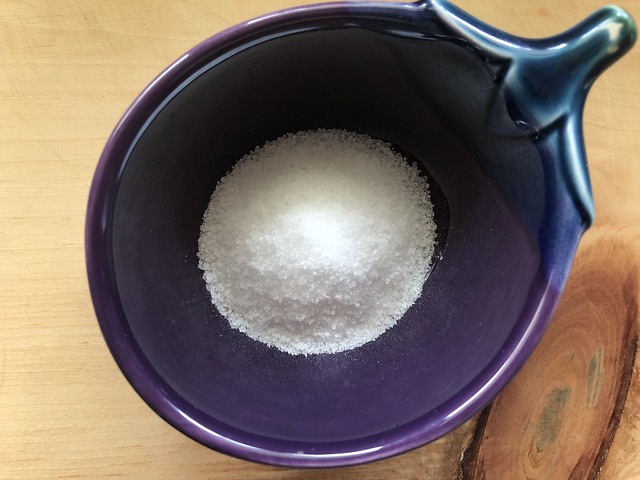
Salt not only flavours the final loaf, it helps with the caramelisation of the crust, and regulates the yeast's activity: too much and the dough will not rise, too little, and the bread will be bland and over-prooved. The general consensus is 2% of salt, however, there is a tiny little margin: I like to taste the salt in my bread, so I occasionally add a touch more, namely 10g to 450g of flour (or 2,2%). The type of salt used is only of personal importance, what you have on hand, and what you enjoy to cook with, is perfectly fine.
All bread-making, whether conventional or no knead, follow a specific sequence of steps. Autolysis refers to the chemical reactions that occur when wheat flour comes into contact with water: the starches swell up, enzymes are activated, two different proteins bind together to form gluten. These reactions will occur regardless of whether or not yeast is present in the dough, which is why some regard this step as optional. However, it would appear that autolysis is more complete when yeast is left out of the dough and does not hinder the other elements. Since 'no knead' implies that there is little physical input to building the gluten structure of the dough, an extended yeast-free autolysis seems particularly important in this case. Generally, salt is also left out of the dough, so most bakers tend to hold back some water to dissolve the salt in, and add it later. But as I am the forgetful sort, I always mix in my flour, water and salt from the start. Autolysis can be as short as 15 minutes, and as long as 12 hours: 30 minutes seems to be the general consensus. Be aware that whole wheat flour contains bran, which has sharp edges that can slice through gluten, so a longer autolysis (at least 90 minutes) softens up the bran and gives better results.
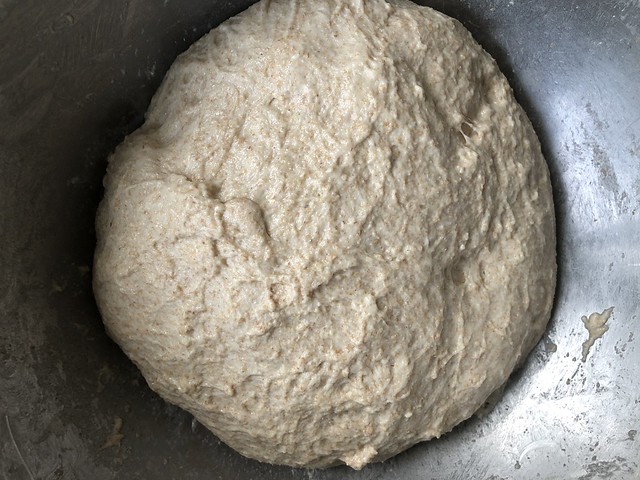
Following the autolysis, the sour (or regular yeast) is added to the dough, along with salt, and thoroughly mixed in: this will be the only time when anything resembling kneading is performed. The dough is then left to bulk ferment, so-called because the entire batch ferments together, as opposed to divided into loaves. Bulk fermentation is normally done at room temperature, ideally somewhere between 18ºC/64ºF and 25ºC/77ºF, and lasts 8 to 12 hours. Timing will vary greatly from one season to the next: in winter, bulk fermentation can be done overnight, so that you can catch some sleep; on the other hand, during a heatwave, the dough will often be ready for the next stage in as little as 4 hours. It is always possible to slow things down, by placing the dough in the refrigerator, if more time is required.
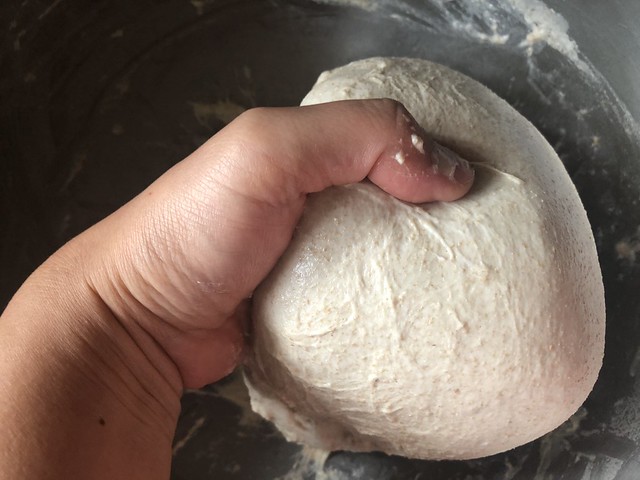
During the bulk proof, it is generally advised to give the dough a light work out, consisting mainly of gentle stretching to further develop the gluten structure in the bread. I say 'generally', because I have found that in a lower hydration dough (70-76%) this stretching did not result in a noticeable difference. However, in higher hydration doughs, this helps to develop the body necessary to hold up a free-form loaf -which means if you intend to bake a higher hydration dough in a bread tin, you can get away with shortening or skipping this step. There are two methods of stretching the dough: the most popular is the 'stretch and fold', whereby the ball of dough is lifted out of the bowl by its middle then gently folded back onto itself.
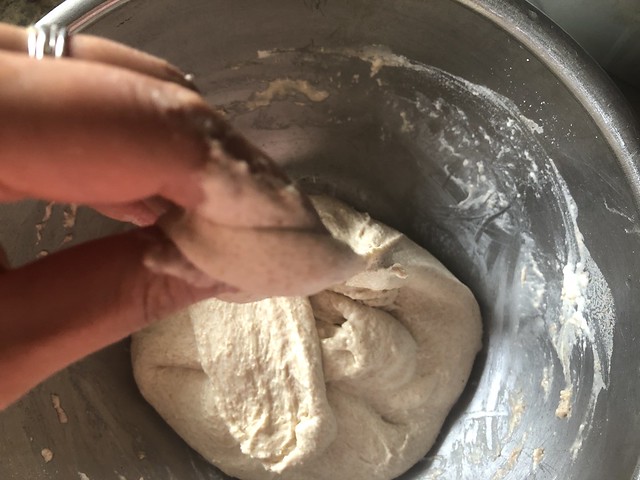
The second method is especially handy for very soft and flabby doughs: I call it 'pull and tuck' -the one book I have that refers to this technique is in a box somewhere, so I can't find its proper name- a corner of the dough is pulled out as far as it will go, then tucked into the middle of the dough. In both cases, the stretching is repeated four times, giving the bowl a quarter turn in between stretches. If your schedule allows, these work outs should be repeated every 20-30 minutes, at least three times during the bulk fermentation.
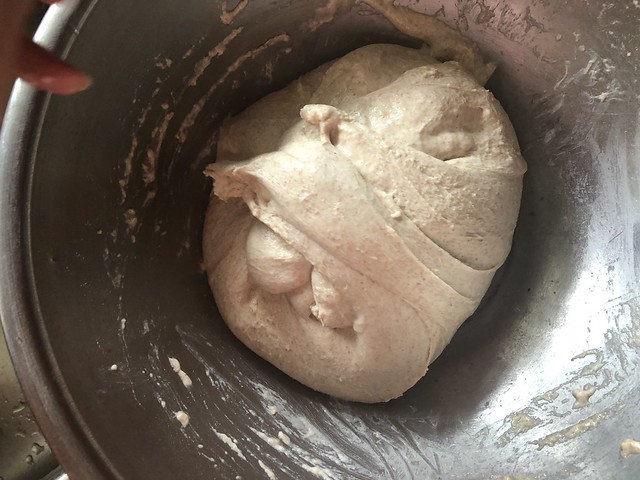
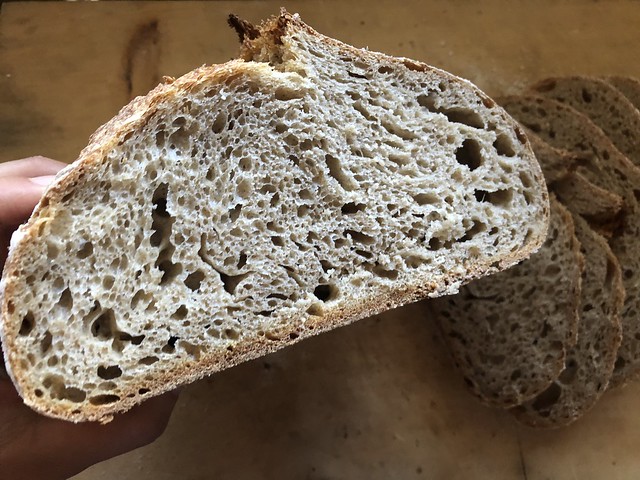
It can be difficult to judge when the bulk proof is done: dough does not always double in size, especially when it's made with whole wheat flour. Some signs to look for: removing the lid from the bowl may release a tangy whiff; the dough should look visibly relaxed - give the bowl a gentle shake, the dough should wobble or jiggle; some air bubbles may be visible on the surface of the dough; the dough's surface should look glossy and taught. Sometimes, especially on warmer days, the dough may look craggy and knobbly, a little like a deflated balloon, it may even appear much more runny than you remember, and distinctly sour and alcohol smell may emanate from the dough: these are signs that the dough has over-proofed. It happens, and it's nothing to worry too much about.
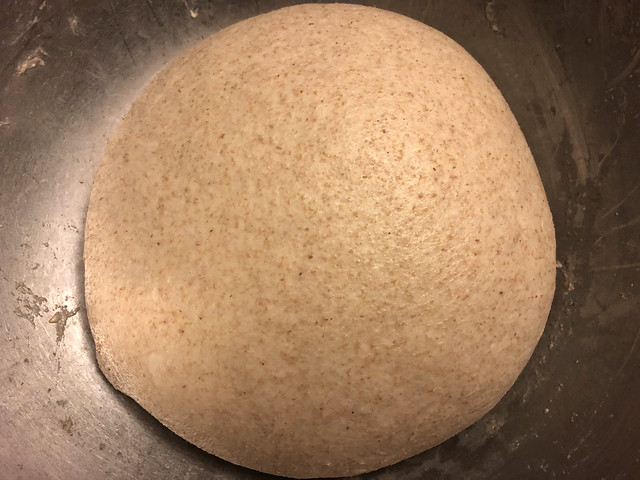
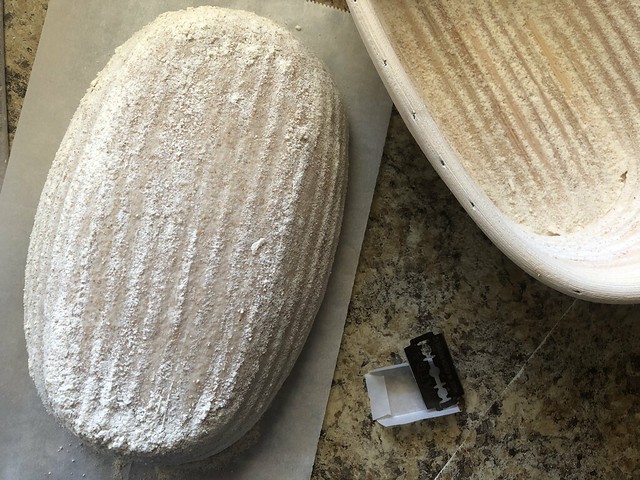
If you have made a larger batch of dough, it is now time to divide it into portions using a dough scraper or a knife. The ball(s) of dough are then given a 'preshape.' Start by tightening up the dough by either stretching and folding or pulling and tucking it until it sits a little more proudly (you'll need to flip over a pulled and tucked dough.) Let the dough rest a few minutes, during which time you can prepare your bread tin or proving basket. If using a tin, grease with a solid fat of some sort: I am quite partial to butter, but margarine or coconut oil are good vegan alternatives, and if you are not a vegetarian, then bacon fat is an option. If using a proving basket, line with a clean tea towel, and lightly flour it. Now for the final shaping: lightly flour your work surface, and flip over your ball of dough so that its tight topside is now on the bottom. Pull and tuck the dough as many times necessary to really tighten the dough: it should come to look as near to a ball as possible, pinch the seams so that the dough doesn't splay out. Place the dough right side up in the prepared tin, or as is in the proving basket (the dough will get flipped out of the basket when ready to bake so that the bottom becomes the top of the loaf.)
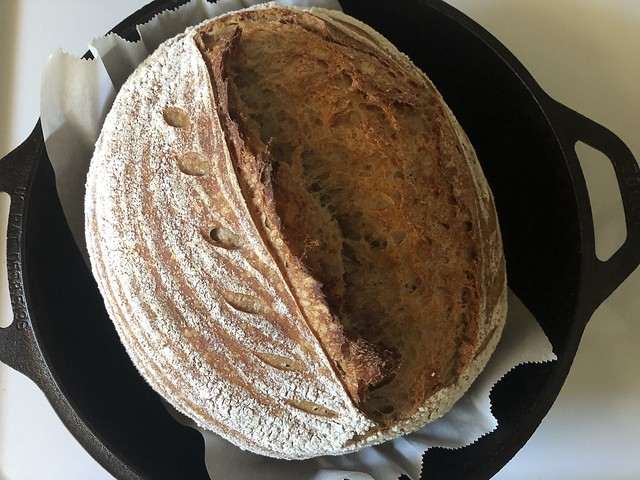
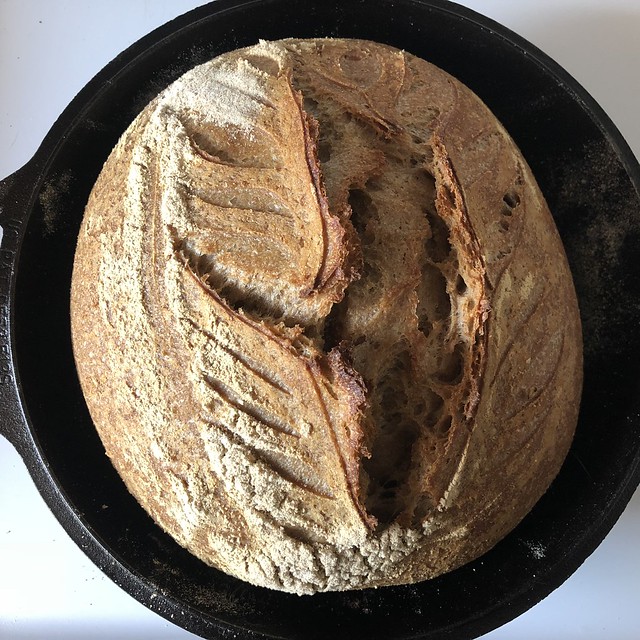
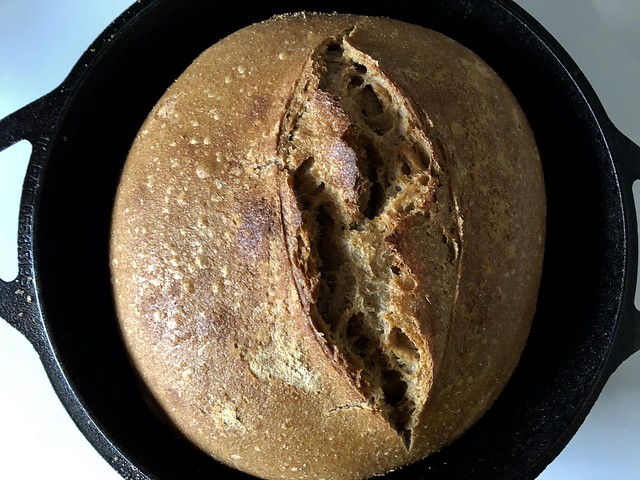
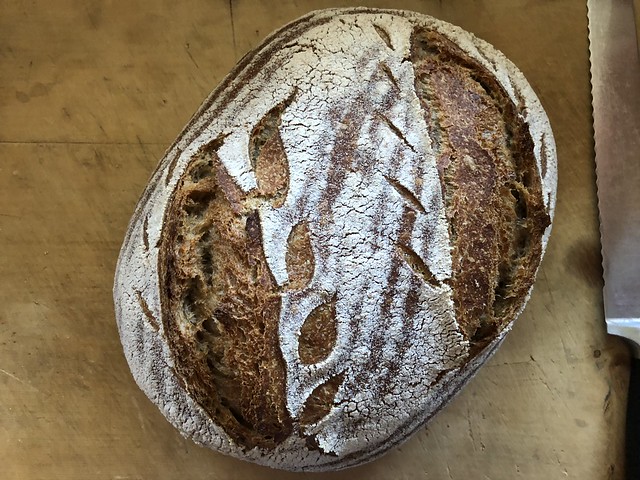
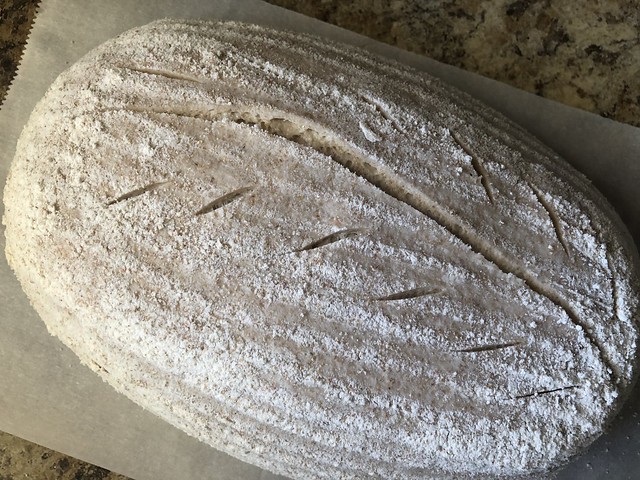
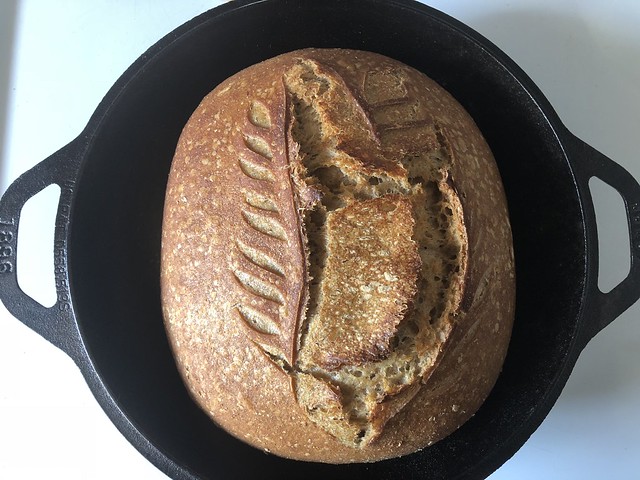
The final proof normally takes half as much time as the bulk fermentation at room temperature: sitting anywhere between two and six hours, which may or may not fit in your day. For convenience, it is possible to slow down the final proof, also known as a retard, this simply means placing the shaped dough in the refrigerator until you are ready to bake. Fermentation will continue until the dough is completely chilled, at which time the yeasts will go dormant, and only some of the lactic bacteria continue their activity. A lengthy retard will result in a more pronounced tartness, but also a much more digestible and nutritious bread. Indeed, people with mild gluten intolerance often find that sourdough breads pose no problem to their digestive track. Another boon to a long and slow final proof is the development of a dry skin on the loaf: this skin is rather important if intricate scoring of the crust is desired.
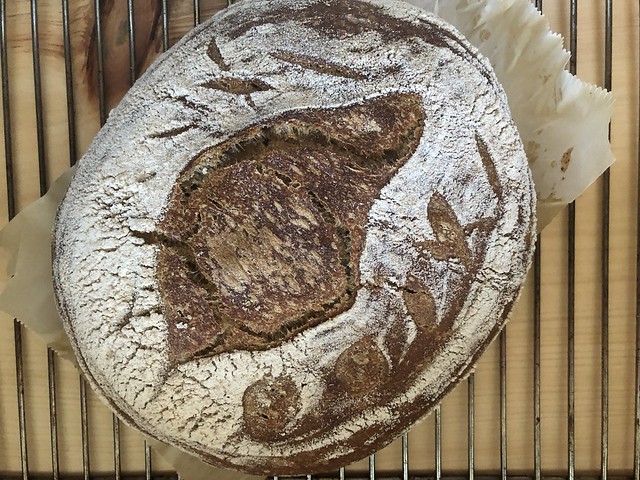
Domestic ovens are rarely designed with bread baking in mind, even the most innovative high-tech ones are rarely up to the task, though there are ways around it. Baking bread in a casserole/Dutch oven as described in my previous no-knead posts is one way to improve baking conditions; using a pizza stone and a pan of water to create steam is another. However, if your main goal is to obtain a square loaf of bread suitable for toast and sandwiches, there is little need to worry about all these trappings: pre-heating the oven on its highest temperature (225ºC/500ºF), waiting 15 minutes after the oven reached that temperature before placing the bread tin on the middle shelf, then baking at that high temperature for the first 20 minutes, then turning down the oven to 180ºC/350ºF for the next 20 minutes, should give more than acceptable results.
And now to put the theory to practice! There will be a basic bread dough recipe in Part Two, and I will delve a little more deeply in the theory. If you have any questions you would like me to address, please comment below, and I will try to answer as best I can.
Happy Baking!


Nice post, thanks so much for this sharing!
ReplyDeleteWhy thank you! I'm glad you enjoyed it. I'm working on Part 2 as I write, so keep your eyes peeled for it!
DeleteI hope I can see more posts. I want to read your articles. Because they are very useful, I always wait for new posts. They are my cup of tea. Thank you for your contribution to the community. nhà cái uy tín số 1
ReplyDeleteThank you for the nice comment! I haven't been writing very much lately, but I will try to post something soon!
Delete